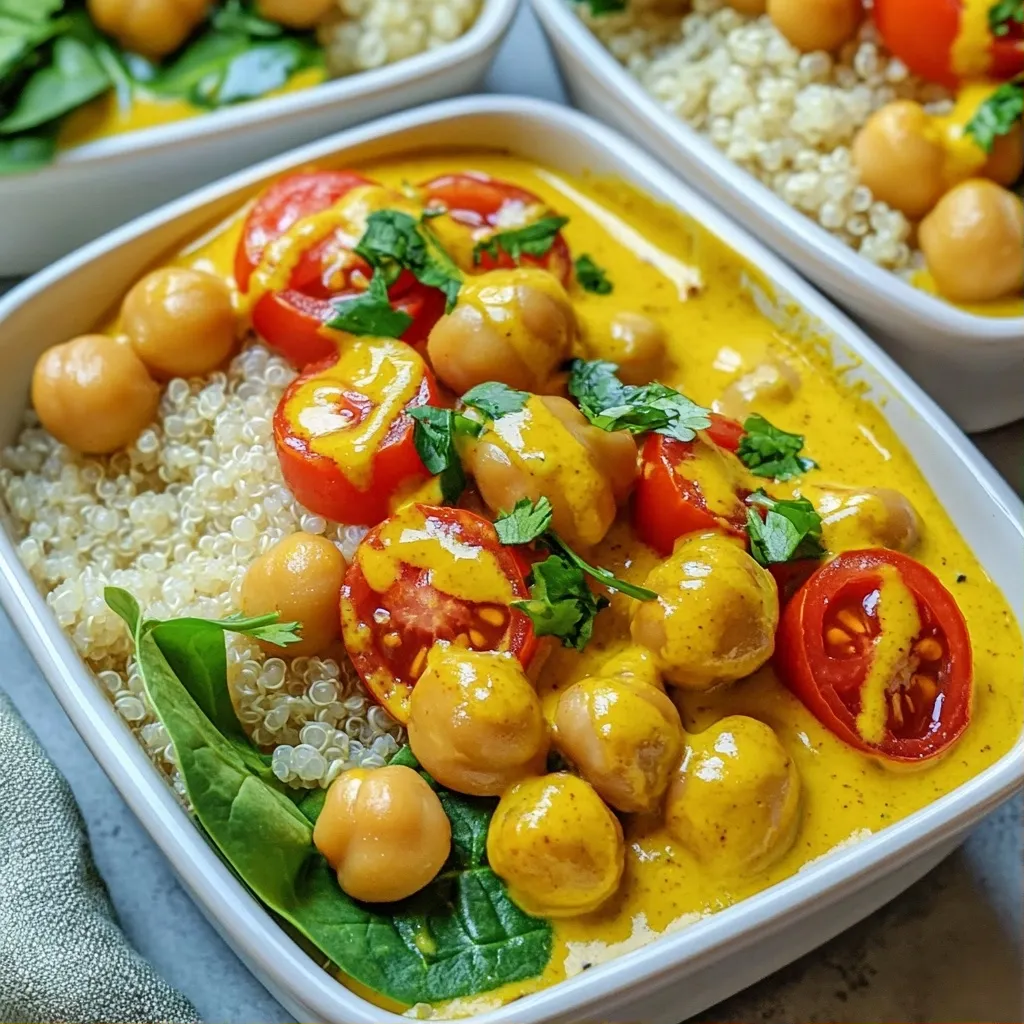
Are you ready to spice up your meal prep routine? My creamy high protein Coconut Curry Chickpea recipe is packed with flavor and nutrition. This dish is perfect for anyone seeking healthy, filling meals that don’t skimp on taste. Join me as I guide you step-by-step through the process of creating a rich, satisfying meal that keeps you energized throughout the week. Let’s dive into this delicious journey together!
Why I Love This Recipe
- High in Protein: This recipe is packed with chickpeas, providing a great source of plant-based protein to keep you full and satisfied.
- Creamy Coconut Flavor: The addition of coconut milk gives this curry a rich and creamy texture, making it a delightful comfort food.
- Quick and Easy: With a prep time of just 15 minutes, this meal is perfect for busy weeknights or meal prep sessions.
- Versatile Ingredients: Feel free to customize with your favorite vegetables or proteins, making it adaptable to various dietary preferences.
Ingredients
List of Essential Ingredients
- 2 cans (15 oz each) chickpeas, drained and rinsed
- 1 can (13.5 oz) coconut milk
- 1 medium onion, diced
- 3 cloves garlic, minced
- 1 tablespoon fresh ginger, minced
- 2 tablespoons red curry paste
- 1 teaspoon turmeric powder
- 1 teaspoon cumin powder
- 2 cups fresh spinach leaves
- 1 bell pepper, diced (red or yellow for sweetness)
- 1 cup cherry tomatoes, halved
- 1 tablespoon soy sauce (or tamari for gluten-free)
- 1 tablespoon olive oil
- Salt and pepper to taste
- Fresh cilantro for garnish
- Cooked quinoa or brown rice (for serving)
Notes on Ingredient Substitutions
You can swap chickpeas for lentils for a different taste. If you want a lighter flavor, use light coconut milk. For a spicy kick, add more red curry paste or fresh chili peppers. Use vegetable broth instead of coconut milk for a less creamy dish.
Nutritional Benefits of Key Ingredients
Chickpeas are rich in protein and fiber. They help keep you full and support digestion. Coconut milk adds healthy fats, giving you energy. Spinach is packed with vitamins A and C, great for your health. Bell peppers are high in antioxidants, which may help fight disease.
Step-by-Step Instructions
Detailed Cooking Steps
1. Start by heating olive oil in a large pot over medium heat.
2. Add the diced onion and stir it for about five minutes.
3. Once the onion is soft, mix in minced garlic and ginger.
4. Cook for one to two minutes until you smell a nice aroma.
5. Toss in red curry paste, turmeric, and cumin. Stir well to coat the onions.
6. Let it cook for about one minute to bring out the flavors.
7. Pour in the coconut milk and soy sauce. Mix it all together.
8. Add the drained chickpeas, diced bell pepper, and halved cherry tomatoes.
9. Stir again to combine all ingredients nicely.
10. Bring the mix to a gentle simmer. Lower the heat if it bubbles too much.
11. Let it cook for about ten to fifteen minutes. This helps the flavors blend.
12. In the last few minutes, stir in the fresh spinach leaves. They will wilt down.
13. Taste your dish and add salt and pepper as needed.
14. Remove from heat and let it cool a bit before placing it in meal prep containers.
Tips for Ensuring Perfect Texture
- Make sure to sauté the onion until soft. This adds depth to your dish.
- Stir the coconut milk well to avoid any lumps.
- Let the curry simmer gently. This helps all flavors marry well.
- Add spinach at the end. This keeps it bright and fresh.
Time-Saving Preparation Techniques
- Chop onions and garlic ahead of time. Store them in the fridge for quick use.
- Use canned chickpeas for a fast protein boost. They save a lot of time!
- You can make a double batch. It’s great for future meals and snacks.
- Cook your quinoa or rice while the curry simmers. This saves time on cooking.
Tips & Tricks
Storing and Reheating Meal Prep Containers
For meal prep, choose sturdy containers. Glass or BPA-free plastic works well. Divide the curry into portions. Let it cool before sealing. This helps keep it fresh. Store in the fridge for up to four days.
When you want to reheat, just use the microwave. Heat it on high for about two minutes. Stir halfway through for even warmth. You can also reheat on the stove. Just add a splash of water to avoid sticking.
Adjusting Spice Levels for Taste
If you like it spicy, add more red curry paste. Start with a teaspoon more and taste. You can also add fresh chili or chili flakes. For a milder dish, reduce the curry paste. You can also add more coconut milk to balance the heat.
Taste your curry as it cooks. This lets you adjust flavors to your liking. Don't be afraid to experiment!
Adding Extra Protein Options
Want more protein? Try adding cooked chicken or shrimp. Tofu is a great plant-based choice too. You can also blend in lentils for added nutrition. Chickpeas are already high in protein, but these options can help.
If you want a quick boost, stir in some nuts. Cashews or peanuts add crunch and flavor. Mix and match to find what you love!
Pro Tips
- Use Fresh Spices: Freshly ground spices can enhance the flavors of your curry significantly. Consider grinding whole spices like cumin and turmeric just before using for a more aromatic experience.
- Adjust the Heat: If you prefer a spicier curry, add a pinch of red pepper flakes or a sliced chili pepper along with the red curry paste to achieve the desired heat level.
- Meal Prep Storage: This curry can be stored in airtight containers in the refrigerator for up to 5 days. It also freezes well, making it great for meal prep!
- Garnish for Flavor: Always garnish your dish with fresh cilantro or a squeeze of lime juice just before serving to elevate the flavors and add a refreshing touch.
Variations
Alternative Vegetables to Incorporate
You can change the veggies for more flavors. Try adding carrots or sweet potatoes. They add sweetness and texture. Zucchini and broccoli also work well. Just chop them into small pieces. Add them at the same time as the chickpeas. This keeps them tender but not mushy.
Different Protein Sources for Customization
If you want more protein, add tofu or tempeh. You can sauté diced tofu until golden brown. This gives it a nice crunch. Tempeh can be crumbled into the curry. You could also use lentils for a twist. Just make sure to adjust cooking time for lentils.
Modifying for Dietary Preferences (Vegan, Gluten-Free)
This recipe is already vegan and can be gluten-free. Use tamari instead of soy sauce to keep it gluten-free. Check the red curry paste for gluten, too. Most brands are safe, but it’s good to check. If you want a nut-free version, skip any nut-based toppings. Enjoy this meal without worry about dietary needs!
Storage Info
Best Practices for Meal Prep Storage
To keep your coconut curry chickpea meal fresh, use airtight containers. Glass containers work best. They help retain flavor and keep your food safe. Before storing, let the curry cool to room temperature. This step prevents moisture buildup. Label your containers with the date you made the meal. This way, you’ll know when to eat them.
Shelf Life of Coconut Curry Chickpea Meal Prep
When stored in the fridge, your coconut curry will last about 4 to 5 days. It stays tasty and safe to eat within this time frame. If you notice any off smells or discoloration, it’s best to throw it out. Eating spoiled food can cause stomach issues.
Freezing Instructions for Long-Term Storage
To freeze your coconut curry chickpeas, portion them into freezer-safe containers. Leave some space at the top to allow for expansion. You can also use freezer bags, squeezing out the air before sealing. This meal can last up to 3 months in the freezer. When ready to eat, thaw it overnight in the fridge. Reheat in a pot on low heat until hot. Enjoy your meal with quinoa or brown rice for a delicious finish!
FAQs
How to make Coconut Curry Chickpea Meal Prep more flavorful?
To boost flavor, try adding more spices. You can use coriander or cardamom for depth. Fresh lime juice gives a nice zing. A pinch of sugar balances the heat from the curry paste. You could also add chopped chili for extra spice. Finally, try topping your meal with fresh herbs like basil or mint. These will brighten the dish and enhance its taste.
Can I use dried chickpeas instead of canned?
Yes, you can use dried chickpeas. Soak them overnight in water. This helps them cook better. After soaking, cook them in a pot or pressure cooker until soft. It may take longer than using canned chickpeas, but the flavor is richer. Just be sure to drain and rinse them before adding to the curry.
What to serve with Coconut Curry Chickpea Meal Prep?
This dish pairs well with cooked quinoa or brown rice. Both add great texture and fiber. You can also serve it with naan bread for a fun twist. A side salad with fresh veggies can balance the meal. For added nutrition, sprinkle some chopped nuts or seeds on top. These options make your meal even more delightful and complete.
In this post, we covered the key ingredients, cooking steps, and helpful tips for Coconut Curry Chickpea Meal Prep. You learned about ingredient substitutions and nutrition benefits that enhance your meals. Many ways exist to customize this dish for your taste and dietary needs. Remember to store and reheat properly for the best experience. With these insights, you'll prepare delicious meals effortlessly and enjoy every bite. Take your cooking skills up a notch with these simple ideas!